Thursday, December 24, 2009

Much ado about stamping


So i decided to take on the task of making personalized stamps for all of my 15 coworkers this christmas. It was definitely a bit more than I bargained for and I'm not actually sure of what they will actually be used for HOWEVER I did eventually get them done for the most part (except for suzi's which I will finish tonight) and in time for christmas and everything! Go me! People seemed pretty happy with them although my coworkers are all amazing and would seem thankful for whatever you gave them, with the exception of perhaps a kick to the head or a disease. They're odd like that.

Anyway I tell you all this because I hadn't posted to the blog for awhile and thought this the perfect opportunity to update.

In a perfect world in which I wasn't a procrastinator and had actually looked around to get the proper size stamper block (I wanted it to be bigger then the actual stamp itself) before it was down to the last minute then my project might have gone a bit smoother. Because this isn't a perfect world I had to pretty much do with what i could scrape together at micheals and hope for the best!


The hardest part of this project was thinking of what to do for each coworker. After that i carved each indiviual design onto the individual lino stamps which i then glued red felt to. In the meantime I covered small wooden blocks with identical red felt and attached them to the stamps. Bada-boom Bada-bing finito. It actually took me a really long time. Don't let the crappy quality of the stamps deceive you ;)

Here in no particular order is a few of the stamps that I ended up with.


So that is a small example for you! I love block printing. I really need to do more of it, just need to find the time. In other news (which is really news as old as time itself) shock of all shocks this years new years resolution is again to lose weight -_-. However this time i actually joined a gym! Watch out pants. You have slumbered in my dresser for too long! Hopefully one of these posts i will have news about excellent weight loss success! I guess we'll just have to see :D

Saturday, November 14, 2009

Corn and Crab Chowder


Since it's November and it's getting chilly out I'm starting to think about soups and stews! I tried an especially delicious recipe last night from the cook book "The complete best of bridges Cookbooks volume 1". I unfortunately forgot to buy the onion when i was making this and was really too lazy to go buy one after i had started the chowder so i imagine it would be even better with this addition but i have to say it was pretty darned good on it's own! Also since I seemed to be having a tough time getting the right ingredients I also managed to get garlic butter instead of the regular stuff. I love garlic though so I didn't mind :D

4 slices of bacon
1/4 cup butter
1 small onion, chopped
1/3 cup flour
3 cups milk
2 medium potatoes, peeled and diced and set in cold water
1 small green pepper, seeded and chopped
1 stalk celery, diced
1 bay leaf
1 cup half and half cream
10 oz crab meat
1 can whole kernel corn (12 0z/341 ml)
salt and pepper to taste
1tbsp chopped parsley

fry bacon until crisp, cool and crumble. Set aside. In a large saucepan, melt butter and saute onion until soft, Add flour, stir and cook gently for 1 minute. Gradually add milk, stirring constantly until thickened. Drain potatoes and add to sauce with green pepper, celery, bay leaf and cream. Simmer 35-40 minutes. Add crab, corn and bacon; heat through, season with salt and pepper. garnish each bowl with parsley. Serves 6

I also decided to try and make some small buns to go with this (creamy soup without bread just isn't the same for me) and in the end i just ended up using the pillsbury crescent rolls dough instead. It's easy and delicious but before you know it you realize that you have eaten four crescents worth of bread. Dangerous! I think that this is a great soup for a cold winters night and with the buns it's really filling! Try it out and let me know what you think!


Thursday, November 5, 2009

I originally had a different blog that was about healthy recipes for satisfying your manchild. I love to cook so I thought I might just incorporate recipes every now and again when I find one I like :)

Too Good Turkey Bacon Wrap


*I couldn't find the recipe online and I'm too lazy to write it all down from the cook book so you're going to get the watered down version*


Ingredients:

*1 slice of low fat American Cheddar Cheese for every wrap (I couldn't find this in my grocery store so i just went with marble)
*Lettuce (I say just bring a head of lettuce out of the fridge and let people take however much they want in their wrap)
*Boneless skinless turkey breast (For two people I had 2 regular sized ones of these)
*Whole wheat Tortilla wrap shells 2-4 depending on how much you want
*4 slices fat free turkey bacon (I know I know, it's no substitute for real bacon but trust me mixed with everything else it's fabulous)
*1/2 a cucumber sliced and diced
*1/2 a red pepper sliced and diced
*1 tablespoon of light mayo
*1 tablespoon sunflower oil
*1 clove of garlic, diced or put through one of those garlic presses
*5 mushrooms cut up into bite sized peices

Heat up a large wok/frying pan and put in the tablespoon of sunflower oil. Put close to full heat depending on your stove top. (I like to start on high because for one, I'm an impatient fat chick who wants her food NOW. I just make sure to keep an eye out to make sure i'm not burning anything)

While the pan is heating up chop up your boneless skinless turkey breast into small, bite sized pieces. When the sunflower oil is heated up put in your turkey and turn the heat to just above medium heat. This is a good time to get your red pepper chopped up and your garlic pressed. Once your turkey has begun turning white, add the veggies and garlic into the pan and cook for 5 minutes being careful to stir everything as you go to make sure that it all gets properly cooked.

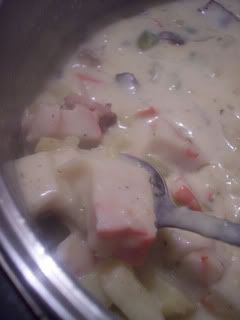
When everything is cooked put it all into a large bowl. If you have a separate frying pan then feel free to cook the turkey bacon in that while you make your turkey and veggie mix in the other. If you don't have another pan just cook the turkey bacon in the same frying pan that you cooked the first ingredients in. When the turkey bacon has bacon has become crispy to your liking tear it into little pieces and add it to the bowl that has the skinless turkey/red pepper mix and mix them all together. This is the time to add the cucumber as well.

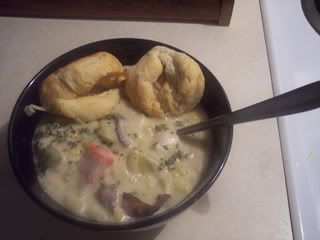
Once everything is in the bowl this is a good time to add that tablespoon of low fat mayo, mixing thoroughly. If you want, you can put the tortilla shells in the micro wave for 10 seconds to heat them up a bit. When they are ready put a few slices of lettuce on them and one slice of cheese* on each and then finish off with the turkey/veggie mixture. Wrap as you like and Voila! You are done and have a delicious, healthy, easy dinner!

*When I made this for the first time I made the mistake of shredding the cheese into little, hard to see pieces. Consequently my man child saw a tiny bit of cheese in my wrap and was jealous because he didn't see any in his. Cheese jealousy is the worst. The situation could have become rather out of hand if I hadn't gone to the kitchen and come back with his very own slice of cheese.

The Verdict

I really loved this dinner and thought it was very tasty. My manchild, although not quite as enthusiastic as me (even with the cheese! Sometimes manchildren are hard to please! I think I just inadvertently made a rap-no pun intended) seemed to enjoy it as well. In fact he gave it 4 out of 5 Autobots.


Anyway that's all for now. I definitely recommend trying this one out. It will make your manchild stroke his manly beard with happiness.

Friday, June 12, 2009

On June 20th I am doing an Intro to Silk Screening Demo at work. I had never silkscreened before so this has been an experiment for me. After a few not so successful attempts I finally had success! I tried to take some photos as I went along so that it would be easier to follow. I found a lot of my information from some great websites so I will include the links to those at the end of this Tutorial.

The first style of Silk Screening that I will be blogging about is the Speedball drawing fluid and Screen fluid method. 


Lets start with the tools used:

* Silk Screen (These days they aren't made of silk but this is what they are usually advertised as) Mine was 10 X 12 and a good size to make a regular sized tshirt print on. I only used about half of it so that I can use the second half to demo mask ease in my demo.

* Squeegee to push ink through screen onto design.

* Speedball Fabric Ink, black.

* 4 OPUS Capella Round brush. I found that this brush was the perfect size for more detailed lines without being too small to fill in the larger areas. At only a couple of bucks the price was right too!

* Masking Tape to cover the edges of the screen. This makes clean up quite a bit easier and helps to keep ink out of unwanted areas.

* Newspaper to keep your work area clean. Maybe it's just how i do things but I found this to be a messy process.

* A sturdy peice of cardboard or an old library card or something of this sort to scrape off the remaining ink as you go along. I think in the long run this will save you a bunch of ink.

* A tshirt! I hit up zellers and got your run of the mill, pink cotton tshirt because I couldn't find a pack of fruit of the loom ones. I think it's probably best to go with cotton. Wash it before printing on it.


I think that's about it :) Now on to the actual Process!

Since this can be a messy project it's always good to have some newspapers down underneath the screen and some paper towels at hand. 

I started with a simple design that I had used before. I went into photoshop and sized it appropriately, setting it to black and white and making it lighter to save printer ink. I think by now you have probably come to realize that I am a penny pincher when it comes to art supplies. It's probably my Scottish background :)

Anyway once you have your design, trace it onto the flat side of your screen with a soft lead pencil. I used a 6B. Make sure that you have it the right way so that you don't end up printing your design backwards. I think it helps to tape the design that you are tracing to the screen so that it doesn't move around. 


While tracing my design I kept in mind that since my brush wasn't super fine pointed. For example I made a the line of the tail thicker to achieve a nicer effect. Also I tried to put lines through the areas that I wanted completely covered in drawing fluid.

Basically the part of the design that you want to be printed onto your tshirt, you want to cover in drawing fluid. 

Once finished tracing the design take away the drawing that you traced from and cover the area underneath the screen with newspaper. It is also a good idea to apply masking tape to the insides of the screen well (as seen one of the later pictures) as well as the areas that you won't be printing. This saves screen filler and makes for an easier clean up. 

We are now ready to apply the drawing fluid! Make sure that the Drawing fluid is well mixed before applying. When you have done this you are ready to apply the drawing fluid to your screen. 


I used a small round brush to apply drawing fluid to the areas that I wanted to be printed. For example, I want the whole of the squirrels body to be a solid part of the design and so i covered it in drawing fluid. You're pretty much just painting the design that you want printed on your tshirt with drawing fluid like is pictured above. Here is a clearer picture:


After you have painted on the drawing fluid, it's a good idea to hold it up against a light to see if you have missed any spots or if any bubbles have formed. Take this opportunity to touch up those areas with more drawing fluid. 

Wait for the drawing fluid to dry before moving on to the screen filler. I say mine might have taken roughly 30 minutes to dry although it was a very hot day and I also used a regular house fan to speed up the process. 
 
It's time to break out the squeegee. Pour a thick line of screen filler on the side of your screen next to your image. With the squeegee at about a 45 degree angle, pull it across the screen spreading a thin layer of screen flller across the screen and covering your image. Only swipe once so that the drawing fluid isn't washed out. 


After the filler has dried, take the screen to a sink and wash away the drawing fluid with cold water. 


Use a scrub brush (I bought a nail brush at the dollar store and did the trick!) to get any stubborn drawing fluid out.  After you have done this to your satisfaction leave the screen to dry. Once again i used a house fan at it's highest level and it was dry quite quickly. 

Your screen is now prepared for printing! 


With silk screening you can print on many different kinds of papers and of course on fabric. In a future entry I will show the process of silk screening a tshirt. For now though I will leave you with a picture of the tshirt that I silk screened using the drawing fluid and screen filler method.


Hope you like it!


I wouldn't have been successful without the valuable tutorials and information on the following websites: